Have you heard? We’ve got a new geometry component in Activity Builder! Now you can enjoy all the power of the Graphing Calculator (sliders, list comprehension, CL) alongside a set of fabulous tools for working with geometric constructions. We’re still sanding down a few rough edges, so you’ll need to enable this component in Desmos Labs before you’re able to play with it.

If you want to fiddle with this pattern or make something of your own, head over here.
Of course, we’ve got some tips to help you get the most out of this new component.
Use a student’s construction as the background for a sketch.
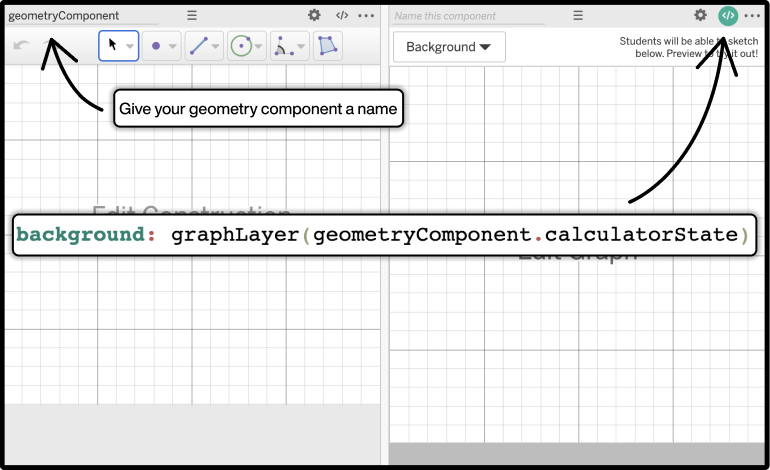
First up, we’ve got a slick way to help students show their thinking. If you want to let students create a construction and then sketch on top of it, start by giving the geometry component a name. Then use CL to set the background of the sketch component you will be using.

You can try out this example over here. As a bonus tip, you can use this technique to set the backgrounds of sketch components, graph components, and even other geometry components.
Pass along geometric objects.
Setting the backgrounds of graphs and sketches allows for plenty of interesting interactions, but that background will be flat; students won’t be able to interact with it. This last tip is all about allowing students to play with their constructions on other screens throughout an activity.
The new geometry component has some useful tools that let us look at the properties of constructed objects. For example, add this expression to a geometry component:

Then add a point and start dragging it around. What do you notice about the value of our expression?
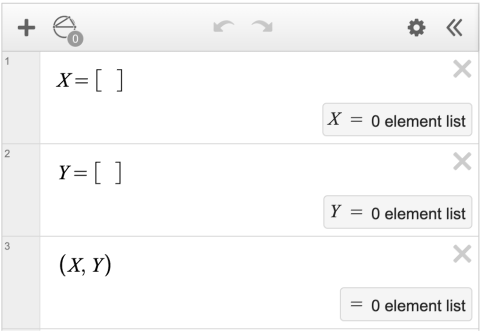
Let’s dive into how we can combine the construction properties with a bit of CL to copy student work across screens. In the first geometry component, where students will create their construction, let’s add the following expressions:

This will create two lists, X and Y. These lists contain the x- and y-values of any points that have been constructed. Be sure to also give that component a name! We went with “geometryComponent.”
Let’s pass along those lists to our second geometry component using some CL:

We’re almost there! All we need to do now is edit the expression list of our second geometry component to display those points:

Now, when you add some points to the first geometry component you’ll see them appear in the second. (Try it out over here). That might seem like a lot of work to copy over a few points when we could’ve simply set the background, but try clicking on some of those points! By using this technique, students will be able to select the points, change their colors, add labels, and perform transformations.
Here’s a nonexhaustive list of properties you can play around with in the geometry component:
- construction.polygons
- construction.segments
- construction.lines
- construction.circles
- (construction.polygons[1]).vertices
If you’re looking for a challenge: Can you use these construction properties to copy a student’s polygon to another screen?